Telegram bot tutorial using python and flask

in this tutorial you will learn how to make a telegram bot and deploy it on a heroku server, the bot will be up 24-7, and you can inject your own brain and responses into it.
Before we start
you will need to have the following
Create the bot on telegram first
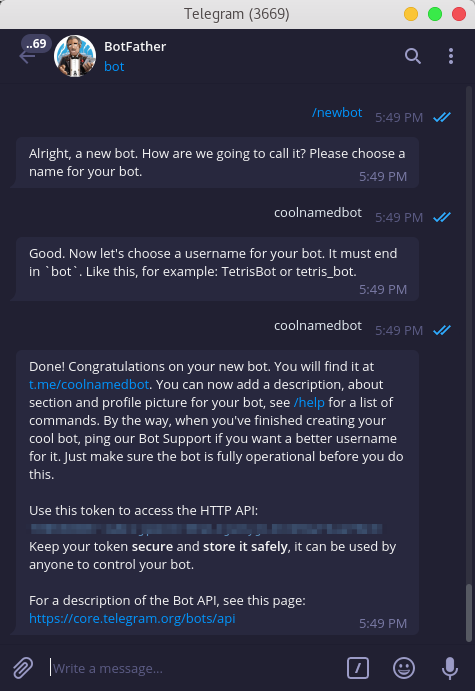
before we dive into coding, let’s finish the easy stuff, we need to ask telegram to create a new bot on the platform, it’s a fairly simple process, you can do so in your telegram app(on windows/linux/android/ios/web) you need to go to botfather which is basically a bot himself that automate the process of creating your bot.
you will need to ask him using the / prefix to start a command, once you start typing it will autocomplete itself, the command you need is /newbot, which will take you to the flow of creating your bot, the bot will prompt you for a name and username for the bot (the username has to be unique), then it will respone with a message like so
Done! Congratulations on your new bot. You will find it at t.me/{bot-username}. You can now add a description, about section and profile picture for your bot, see /help for a list of commands. By the way, when you've finished creating your cool bot, ping our Bot Support if you want a better username for it. Just make sure the bot is fully operational before you do this.

Use this token to access the HTTP API:
{the-bot-token-which-we-will-use-later}
Keep your token secure and store it safely, it can be used by anyone to control your bot.

For a description of the Bot API, see this page: https://core.telegram.org/bots/api
congratulations you now have your bot on the platform!
Coding the bot engine
before we start please note the following
- i assume you use python3
- also my environment is ubuntu 18, it’s unlikely that this will affect your project thought.
now let’s dive into some code, let’s start of by creating a virtualenv for our project, in your terminal type
$python -m venv venv/
now you will have a venv/ directory which will have all the python libraries we will be using, go ahead and activate the virtualenv using the following command
$source venv/bin/activate
now let’s have some libs installed
(venv) $pip install flask python-telegram-bot requests gunicorn
that’s all we need for now, let’s structure our project in a neat way before we start the real coding
.
├── app.py
├── telebot
│   ├── credentials.py
│   ├── mastermind.py
│   |   .
│   |   you can build your engine here
│   |   .
│   └── __init__.py
└── venv
in the credentials.py file we will need three variables
bot_token = "place your token here"
bot_user_name = "bot username"
URL = "the heroku app link that we will create later"
in mastermind.py you could use your super AI to generate response
def get_response(msg):
    """
    you can place your mastermind AI here
    could be a very basic simple response like "معلش"
    or a complex LSTM network that generate appropriate answer

    """
    return "معلش !"
now let’s go back to our app.py and go throw the code step by step
# import everything
from flask import Flask, request
import telegram
from telebot.credentials import bot_token, bot_user_name,URL
from telebot.mastermind import get_response
now let’s create global objects for the bot and the token
global bot
global TOKEN
TOKEN = bot_token
bot = telegram.Bot(token=TOKEN)
at this point we have the bot object which is connected to your actuall bot using the token you have copied from the botfather message we saw earlier.
# start the flask app
app = Flask(__name__)
now we need to bind functions to specific routes, in other words, we need to tell flask what to do when a specific address is called, more info about flask and route can be found here
"""
here the route function respond to a url which is basically /{token} which is the url telegram will call to get responses for the messages sent to him.
"""
@app.route('/{}'.format(TOKEN), methods=['POST'])
def respond():
    # retrieve the message in JSON and then transform it to Telegram object
    update = telegram.Update.de_json(request.get_json(force=True), bot)

    # get the chat_id to be able to respond to the same user
    chat_id = update.message.chat.id
    # get the message id to be able to reply to this specific message
    msg_id = update.message.message_id

    # Telegram understands UTF-8, so encode text for unicode compatibility
    text = update.message.text.encode('utf-8').decode()
    print("got text message :", text)

    # here we call our super AI
    response = get_response(text)

    # now just send the message back
    # notice how we specify the chat and the msg we reply to
    bot.sendMessage(chat_id=chat_id, text=response, reply_to_message_id=msg_id)

    return 'ok'
that’s great but we need to tell telegram to call our app (the one we will create in a minute) so that our function can be invoked, for this we will use webhook which is in a very basic words, a way to let the bot call our server whenever a message is called, so that we dont need to make our server suffer in a while loop waiting for a message to come.
# the route here can be anything, you the one who will call it
@app.route('/setwebhook', methods=['GET', 'POST'])
def set_webhook():
    # we use the bot object to link the bot to our app which live
    # in the link provided by URL
    s = bot.setWebhook('{URL}{HOOK}'.format(URL=URL, HOOK=TOKEN))
    # something to let us know things work
    if s:
        return "webhook setup ok"
    else:
        return "webhook setup failed"
now everything is set, let’s just make a fancy home page so that we know the engine is up
@app.route('/')
def index():
    return '.'
an app can’t run without a main right
if __name__ == '__main__':
    # note the threaded arg which allow
    # your app to have more than one thread
    app.run(threaded=True)
that’s the last code you will write today, now to the last step, launching our app on heroku.
Launch our app on heroku
we need a couple of things before we make our app.
-
heroku can’t know what libraries your project uses, so we have to tell him using the
requirements.txtfile (a common problem is that you misspell requirements so be careful :D), to generate the requirements file use pip$pip freeze > requirements.txtnow you have your requirements file ready to go
-
second you need the
Procfilewhich tells heroku where our app starts, so create aProcfilefile and in it type the followingweb: gunicorn app:app -
A bounce step: you can add .gitignore file to your project so that no-use files don’t get uploaded to the repository.
-
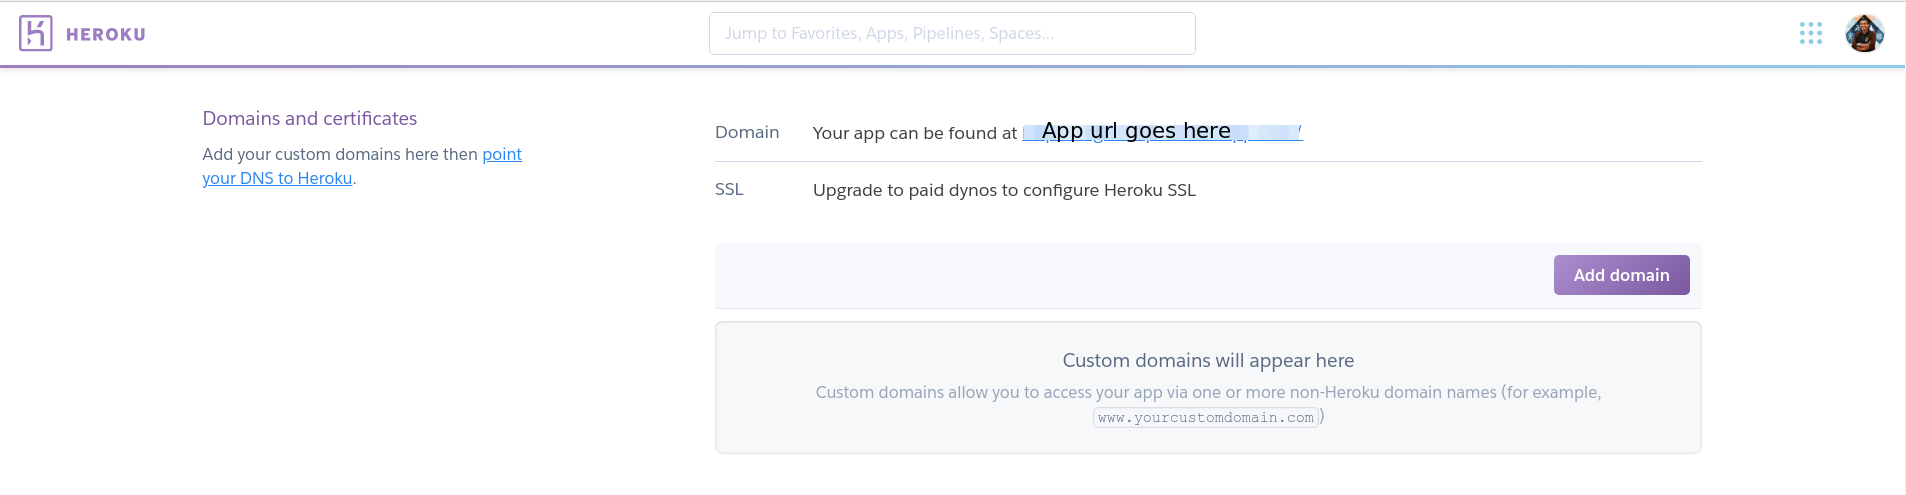
from your dashboard on heroku create a new app, once you create an app it will direct you to the deploy page, open the settings tab in new window and copy the domain of the app which will be something like
https://appname.herokuapp.com/and paste it in the URL variable inside ourcredentials.py
now go back to the deploy tab and proceed with the steps:
-
login to heroku
$heroku loginnote that sometimes this method get stuck in
waiting for login, if this is the case with you, you can login using$heroku login -i -
Initialize a git repository in our directory
$git init $heroku git:remote -a {heroku-project-name} -
Deploy the app
$git add . $git commit -m "first commit" $git push heroku master -
at this point you will see the building progress in your terminal, if everything went okay you will see something like so
remote: -----> Launching... remote: Released v6 remote: https://project-name.herokuapp.com/ deployed to Heroku remote: remote: Verifying deploy... done. -
Now go to the app page (the link of the domain you copied before) and add to the end of the link
/setwebhookso that the address will be something likehttps://appname.herokuapp.com/setwebhook, if you seewebhook setup okthen you are ready to go!
Now go talk to your bot
The complete source code
You can find the source code on github here


Comments